If you’ve been a reader of TeachPianoToday for some time you’ll know that we place a lot of value on visual appeal – eye-catching and beautiful materials, music, games… it really matters to us. Why? Because we know it matters to piano kids!
So when we came up with the the idea for Piano Practice Pegs I was super excited. They combine the “Oh! So cool!” factor that kids crave, with a motivating method for kids to track their own piano practice progress.

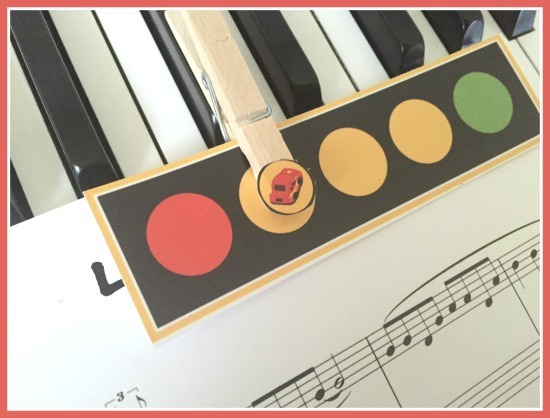
DIY Piano Practice Pegs
All you need to make your own set of practice pegs are some clothes pegs, some glue and our Piano Practice Peg Printable that we’re sharing today!
After you’ve assembled your Practice Peg (super easy… I promise!), simply clip it to the top of your students’ current pieces and instruct them to move the Practice Peg one “space” on the card for each day they practice. Their goal is to reach the last space on the card by their next lesson.
Today we’re sharing a spring-themed version (move the bumblebee along the flowers) and a racecar theme (move the car along the traffic lights).
Directions for Assembly:
1. Print and cut out and the Practice Peg card and “marker” (bumblebee or racecar).

2. Glue the marker to the top of a clothes peg (hit up your local dollar store if you don’t dry your laundry the romantic way on a clothes line)
3. Clip the Practice Peg card along with the clothes peg marker to the top of your piano students’ current pieces!
You can use the card and practice peg over and over again for each new piece that is assigned. A great bonus? It also doubles as a bookmark for your piano students to quickly find their current pieces that need to be practiced.
Looking for More Inventive Practice Motivators?
Check out our other blog posts for more piano practice motivation!
Good Lord, what a cool thing this is. This year, I’m going to make Practice Pegs and Finger Exercise cups. Hope it’s not a “Pintrest Fail” type thing…I’m not very crafty :). I’m also going to use Wunderkeys stickers for my WK kids.
Hi Kelly – I’m not crafty either, which is why I only share DIY ideas that are “fail proof”! The only thing to watch with the fingercise cups is that you purchase balloons that are big enough 🙂 Glad you’ll be using these from the blog today too!
You’re so right…it is “too cute!!” I hope you’ll make even more for different seasons/holidays. I’m sure the kids are going to LOVE these. Thanks for sharing your creativity:)
Hi Barbara – glad you’ll be putting them to good use! We’d love to hear how your students like them 🙂
Thank you for the simple yet super fun tool. I’m restarting my lessons this week so it comes at a great time. Blessings n thanks again for your super creativity.
Hi Miriam – hope you have a great first week back (I’m back at ‘er too!)
Why only 5 days?
Hi David – typically we create practice motivators for kids who are struggling with regular practice. For kids who already practice 7 days a week they don’t generally need these little tools. However, for kids who are struggling to make practice part of their week we think it’s important to set reasonable goals that can be reached – 5 days of practice was what we settled on as being a reasonable yet important goal.
So cool! I’ve been using cute clothespins to hold music open…this takes them to the next level. Can’t wait to try them with students.
What a fabulous idea! Printing out right now!
Wonderful Benita – we’d love to hear how it works with your students 🙂
Thanks for the practice incentive. Anything that encourages more practice is definitely worth trying. I always enjoy reading your posts but have a small problem – I see the links at the bottom and think “I’ll just have a read of that one too”. They are all so interesting and helpful that I normally end up spending quite a lot longer than I intended sitting at the computer but definitely come away with several different ideas and motivation to try different things. It’s really great to have the links as reading earlier posts again reminds me of ideas I may not have used for a while. Thanks for all your fantastic posts and ideas.
Thank you once again for such a cool tip. This is beyond awesome!! I’ll affix a sticker to a colored paper clip instead to make sure those guys stay clamped onto their page so I don’t have any excuses come back. Bwahaaaa. JK. 🙂
Sounds like a great idea Anna! I’m “Paperclipaphobic” around my piano after one slipped down where it shouldn’t go and cost me a lot repair money! 🙂 But yes, they would work well too!
Ahhh, I now understand why clothespins. I’ve never used paperclips on the students’ music before, so that definitely is something to think about. I think I’ll put a cute tag at the top that will stick out from the book. We’ll see how it goes. I’m excited to try this out rather than the forgotten “practice page w/ check off boxes.”
You can get the small clamp type of paper clips as well as paper clips that are shaped into music notes and treble clefs. Both of those are probably large enough that they would not fall in-between piano keys. And there are extra large colorful paper clips as well. I will be implementing your idea in the coming week with some of my students but since I already have some colorful small clamp clips I will be using those. Thanks for the practice help!
Genius idea!
I assume the “finger exercise cups” are discussed on your blog? Do they help kids who refuse to bend their fingers? I have one student who insists on spreading her fingers out like duckfeet, which of course, is severely impeding her progress.
Hi Nancy – the Fingercise cup (link below) is for students with collapsing finger joints who need strengthening or correction. For your “duck feet” student you might want to check out this post too! https://www.teachpianotoday.com/2012/04/12/how-to-correct-hand-position-in-young-piano-students-its-qa-day/
Fingercise Post: https://www.teachpianotoday.com/2015/03/09/the-amazing-fingercise-cup-a-diy-tool-for-fixing-your-piano-students-collapsing-finger-joints/
These pegs look fun and creative. I will be eager to try them this spring. I have missed you guys. I took a semester off from teaching b/c life happens and I guess you guys took some time off from me. I had to re-subscribe. Anyway, glad to be back in the fold.
Hi Tyra – glad to hear you’re back teaching! Nothing personal! Our email program automatically unsubscribes people who haven’t opened our emails in a long time to avoid annoying them 🙂 Happy to have you back!
Wonderful! Thank you so much for this great idea! I can’t wait to use it with my students. Five days is perfect for some of my students that are struggling to complete any practice at all. Seven spaces would be overwhelming I think. (Compared to no practice days, which is the current state of things.)
Hi Brecklyn – our thoughts exactly. Baby steps! Asking for 7 from kids who are not practicing at all is asking for them to fail. If we can get 5 days out of them then that’s typically enough for them to make some good progress and experience the “good” feelings that come from arriving at a lesson prepared and playing well 🙂
So cute and a great visual reminder! You could also use those “paint chip” cards from your local home improvement store for your bookmarks.
I think I will use these as “#times through a song” markers, as I encourage my beginner students to play through a song 3-5 times. This way, they can keep track of what # they are on 🙂 Thanks again for the great resources (makes me get excited about teaching my private students!).
Great idea Sharla!
I was thinking the same thing Sharla! I think I’ll do one for the front of their practice diary to track number of practice sessions, and then one to use for counting number of times though.
Love this! I’m inspired to try to make some character-themed ones……Frozen, Minions, etc….. Thank you!