Lately, we’ve had several teachers email asking, “How do you organize your students’ materials?”, “What kinds of things are inside your piano students’ binders?”… and “How do I stop my piano students’ materials from ending up on the floor of a mini-van?” Clearly, people are begging for a piano binder post 🙂
To me, a piano lesson binder is so much more than a way of simply organizing materials. I want my piano students’ binders to become a keepsake that showcases all of the learning and fun that takes place in my studio. I put a ton of effort into making sure that my lessons are engaging, unique and “That is so cool!” worthy… I don’t want this hard work to get lost or overlooked!
I also have an intense dislike for crumpled paper, lost music and forgotten materials, and so binders also serve as a way of avoiding all of these travesties!
If you share my feelings, then you’ll love the piano binder printables we’re sharing in today’s post. These attractive resources will help your students feel a sense of pride and ownership over their piano lesson materials… which results in organized materials that remain in good shape, get used at home, and always make it back to your studio!
How To Make A “Blinged Out” Binder
Turning piano student binders into an attractive and uber-organized system is easy! Below we’ll show you how to make a “blinged out” binder that your students will go crazy for:
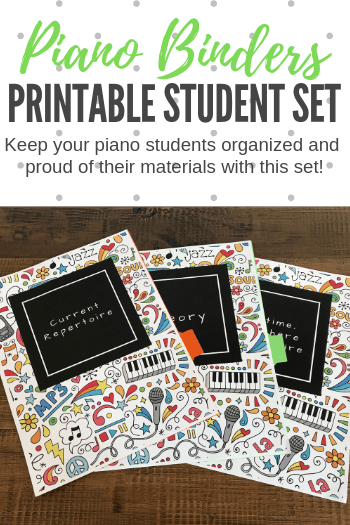
- You’ll need: our printable set of binder covers (download here), a package of binder dividers with tabs (opt for paper ones rather than plastic), a laminator and laminating pouches, scissors and tape.

- Print the binder cover set. Decide on the order of the tabbed pages as you would like them to appear in the binder (you’ll want the tabs to line up in your selected order).
- Place the printed binder cover sheet on top of the selected tabbed page. Line up the left sides of the two pieces and use a small piece of tape on the top and bottom to keep them in place.

- Place the two taped pages from above inside a lamination pouch. Adjust the two taped pages so that the entire tab on the tabbed page sticks out beyond the lamination pouch.
- Using scissors, trim the left side of the lamination pouch along the edge so the package with the tab fits through your laminating machine.
- Run the binder cover through your laminating machine. Be sure to keep it as far to the left as possible when feeding it through the machine.
- Trim excess lamination from around the edges and re-punch the holes in the laminated binder divider with a 3-hole punch.
- Repeat the process for each cover you will be using in your binders. Place the laminated dividers inside a 3-ring binder and enjoy the overwhelming feelings of organization and satisfaction 😉
What’s Inside A “Blinged Out” Piano Binder?
- Lesson Assignment Sheets: To help guide home practice, I recommend filling out printable assignment sheets (which you can find here) every lesson for each student. Every three months I suggest doing a “clean-out” to remove old sheets from the binder.
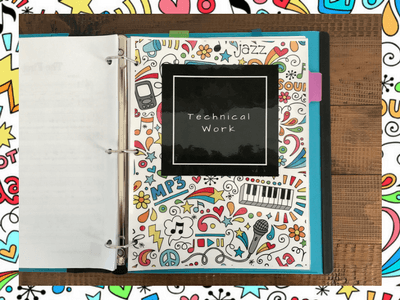
- Technical Work: This section provides an area for your students’ technical exercise sheets (like those found in TEDDtales), scale printables and cards (like these super-cute pentascale cards) and any other materials you use to assist with technical skills.
- Practice Sheets: If you use our printable activities from Shhh…Your Piano Teacher Thinks This is Practice, this is where you’ll want to put them. This section is also a great place for practice incentive handouts and home practice pointers.
- Current Supplementary Repertoire: Place digital copies of music in your students’ Current Supplementary Repertoire section. There should typically be no more than four to six pieces behind this tab.
- “Anytime, Anywhere” Repertoire: As pieces from the “Current Supplementary Repertoire” section are completed, they can be moved behind the “Anytime, Anywhere” tab. This section contains music that your students continue to play as review and should be able to play “anytime, anywhere”. It also serves as great “look at everything you’ve learned to play this year!” storage. I include an “Anytime Anywhere” sheet at the front of this section in my students’ binders. Pieces are added to this sheet as they are transferred to this divider, creating a “Table of Contents” for everything that is added. You can use my template for this found here.
- Theory: This section is where various theory activities can be stored. I also keep a list of games each student has played behind this tab. This game list helps parents understand how game-based learning contributes to their children’s overall musical goals. And your kiddos can keep track of how many times they “beat the teacher”! You can use my template for this found here.
- Music History: This is where I keep the Composer Trading Cards we’ve shared on the blog (stored in trading card page protectors) as well as suggested listening lists and more. Find the trading cards at this link (scroll down to Level 1).
A “Blinged Out” Binder Makes A Big Difference!
Improvement on the piano does not happen without practice. To help my students progress, I search out and destroy any barriers that may cause confusion or frustration or inconvenience to my students and their families. Home piano practice is more likely to happen when it is easy to implement …and it is easy to implement when every single needed material is in one big (beautiful!) binder!
Edited: Due to popular demand we are also now sharing a printable binder cover page! Slide it inside the front plastic sleeve found on most binders to personalize the entire binder. This page includes a spot to write your student’s name (in the bottom box). Find it here.
Absolutely LOVE these! Thanks for sharing! I am redoing my studio’s notebooks this fall and this couldn’t have come at a more perfect time! Thanks for sharing so many great ideas!
Hi Carol – fantastic! We hope it helps to keep your students more organized and motivated to fill those sections with musical goodness 😉
This is FANTASTIC! I am working on binders right now so perfect timing! Thank you!
Hi Kimberly – glad the timing worked for you! Have fun making beautiful binders 🙂
I started using binders at the beginning of summer thanks to your suggestion and it’s been a real game changer for my students and me!! You guys have an endless supply of AMAZING ideas. Truly grateful!
Hi Sara – thrilled you’ve adopted the “binder approach” – I don’t know what I ever did without them! 🙂 I’ve found that my piano parents feel much more informed and part of the overall process as well – they can easily see what their children are learning with a simple flip through each section. This means less emails and questions that I have to answer – which saves me even more time. Win win! Cheers and thanks for reading our blog!
So practical and attractive! Will be using these. Thank you!
Hi Stephanie – so glad you can use them 🙂 Enjoy!
I have these sections in my students notebooks and we also have a section for their plastic business card inserts in the history section for their composer cards and their scale/chord business cards are in the fronts of their notebooks. My struggle is keeping those notebooks organized. The practice sheets tend to pile up. Do your students use 1″ binders or do you use something larger? I also have a fun insert of the Circle of 5ths that I created for my studio and require that all notebooks have a clear plastic cover on the outside where we keep track of their progress around the circle with scales and chord inversions. Thank you for great ideas, Andrea and Trevor!
Hi Jan – I have really heavy-duty 1.5 inch binders. The balance is in finding something that’s not too big, but that’s large enough to hold everything while still fitting on the piano ledge. The sheets do pile up – but I clean out the lesson assignment sheets every 3 months or so and recycle them. With the massive amounts of printing I do it all still fits by the end of the year 🙂 If you’re concerned, pieces that are added to Anytime Anywhere could instead go inside a special 3/4 inch binder full of completed music? Love the idea of putting the circle of 5ths in the front! Right now I just have their name and a cute design…. but that sounds much more practical 😉
I love this! buuuut…..Question: how do you get students to consistently refer to their assignment sheets? I’ve used so many assignment sheets I either found or created, but the majority of kids never refer to them. I currently use yellow stickies that I put check-off boxes on and a note if needed, and stick them poking out the top of page and tell them to play everything that a sticky note is on and check the box each day they play it. It semi-seems to work, but STILL they rarely check the boxes on the sticky note. Ugh. I’d rather use assignment sheets, but I wish they’d refer to them. Thanks 🙂
Hi Anna – I think this is a fairly universal problem 😉 I try to combat this in a few ways:
1) Changing my assignment sheets regularly so the graphics are different and themed with season/holidays etc. This way kids think they are cute and pay more attention to them 🙂
2) Have my students be the ones to write the notes – they’re more invested in the process if it’s in their own words
3) Keep it very short and simple. I avoid writing lengthly notes – a lot of what I teach is done “on the page” of their music so notes are not too necessary in written form
4) Write notes to your student on the assignment page that require an answer… and tell them you’ll look for their answer. I usually put a silly sticker and draw a speech bubble that says “Hey… what’s your favorite kind of pizza?” and leave a ______ for their answer. They get “double stickers” next lesson if they’ve answered my question. This at least gets it open at home 🙂
5) Varying your sheet style – we have several that are a bit different – I’ll an example link below.
https://www.teachpianotoday.com/wp-content/uploads/2014/03/a-maze-ing-practice.pdf
This one is silly, but it helps to get your students who ignore your notes the most back on track: https://www.teachpianotoday.com/2013/11/14/7-ways-to-make-sure-your-piano-lesson-notes-get-noticed/
These designs are so fun and inspiring! I am doing piano binders for the first time this year and will definitely use these designs. Thanks so much for sharing as well as all the how to info. Really helps!!
Hi Marah! So glad that you’re be able to use them 🙂
These are so cute. Love the graphics. Any chance of getting one more sheet that is editable so we could put the student’s name in the square and put it in the clear pocket on the front of the notebook! How could they resist picking it up with that on the front?!! Thanks for these!
Hi Barbara – The licensing for the graphics don’t allow us to make them editable, but we have just added a “binder cover page” with a box where you can write your students’ names. Hope that will work.
That is FAB-U-LOUS!! Thanks so much. I just know these will be a huge hit for the start of the New Piano Year! YOU Are the BEST!!
Where can I find the binder cover page to put the student’s name on? I haven’t been able to locate it.
Andrea — I just found the cover.
Thank you a million times over: You are my secret weapon! Two requests: Could you share a black & white version of this that kids could color? That would save copy $ and let them personalize it before you laminated the pages. And second: Do you happen to have an insert for a binder cover? I did a search, but couldn’t see one.
Hi Loni – you’re very welcome! We’ve just added a link to a binder cover at the bottom of the post 🙂 You can print these in greyscale for a color-able version – during the printing process select “greyscale”. It won’t come up like a coloring book – but that’s as close as it could be. We don’t have a black and white version of it as it’s not our custom artwork, unfortunately. You are always welcome to take our ideas and make your own to suit your individual needs if you want to – perhaps a different design would suit your idea better?
Hi Andrea!
These are fabulous! I love them and would’ve totally loved them too if I was learning piano as a kid/teen! I’m always revamping their binder so it becomes something they love to open and use too. Don’t know why, I can’t seem to open the link when I click on it, it just turns into a black page for me.
Also, just curious, what kind of binders do you use? And what sections/categories have you used in the past and now?
Thanks!!
Hi Drema – can you try refreshing your browser to see if that helps you open the link? Hasn’t been an issue for anyone else, so it might just be needing a refresh. These are the sections/categories that I use currently (the ones we’re sharing). In the past I didn’t have Music History (and felt guilty about it!) but now that I use our Composer Trading Cards I love that section so much! I have had a “Back and Forth” section before for parent/teacher notes back and forth but now I just text 😉
I use 1.5 inch binders that are good quality and “heavy duty” with a clear plastic sleeve in front (to slide the binder cover in) and a pocket inside the front cover (good for keeping cards, manipulatives etc. etc. in) They cost about $8 each. My piano parents pay for them in the materials fee I charge each year.
Do you do a brand new binder each year or just when it becomes full?
Hi Crissy – I use a new binder each year as my students generally want to keep each year’s binder as they’re full of music and activities and compositions that they love and are attached to 🙂 You could certainly swap out the dividers if you wanted to keep them year, to year, however 🙂
Hi Andrea! I LOVE these dividers! Each pack of Avery dividers included 8 dividers, so I was thinking about what the 8th section could include… Would it be possible to create a page that says “My Compositions” or something like that?
I love these – thank you! I also was curious if it would be possible to create “My Compositions” page with the same background as the others so they match! Would that be possible?
I know I am very late coming to this post, but I had an idea and thought I’d ask. Would it be possible to get this as black and white, with just the black part blank – I can put their name in the back part, and they can color it themselves so they can make it their own. I’d like to use it as a binder cover and let each student be unique and show their personalities. Then it would compliment the inside tabbed dividers as well. Thanks! You really have it all for us, I am always finding a new treasure here!!