Early piano repertoire is often presented in predictable hand positions, like C position or G position. Position-based play provides young students with a sense of security and comfort as they navigate beginning note reading, rhythm and coordination. But piano students need to know, early and often, that their hands can move! Giving them frequent opportunities to play “out of position” prevents the development of strong associations between finger numbers and just one set of note names.
While it sounds straight forward, many young beginners struggle with playing out of position for the simple fact that, when they are practicing at home, they simply forget where their hands go;they haven’t fully processed the idea of matching a given finger number/note to their hand placement on the piano. And when this happens… an entire week passes where kids either practice incorrectly or do not practice at all!
So today we are sharing a spring-themed DIY activity that you can use with your students to solve the age-old problem of, “Where do my hands go?’

A DIY Activity For Teaching Finger Number Clues
If you have piano students who never know where to put their hands on the keyboard, then today’s DIY teaching tool will help them solve the mystery. No longer will kids look to you for assistance before beginning a piece. No longer will kids associate “1” with “C”, “2” with “D” and so on.
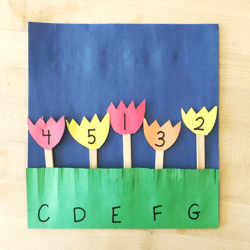
With the crafting skills of a preschooler, you’ll easily be able to create a “hands on” tulip garden that your students can manipulate to match different finger numbers to different keys on the piano:
Step 1: Before beginning, you will need various colors of construction paper, scissors, a glue stick, a sharpie, and 5 popsicle sticks.

Step 2: To make your tulip garden, fold the bottom of a blue piece of construction paper so that it creates a pocket. Cover the pocket with green construction paper, sliced to look like grass. Then, cut five tulip shapes and glue each to a popsicle stick to create five flowers. Write “C, D, E, F and G” (or your choice of note names) on the grass and “1, 2, 3, 4, and 5” on the flowers.

Step 3: Your tulip garden is now ready to use! Place it on the piano in front of your student and have her arrange the tulip sticks in any order (placing one numbered tulip stick behind each note name label). Now, starting from the left, instruct your student to name the first finger number, name the first note and then use these clues to place her RH fingers on the piano. For example, if the “4 tulip” is in the “C pocket” then she would place her right hand 4 finger on C and rest her remaining fingers on the neighboring keys. This procedure should be repeated for each remaining flower. Upon completion, have your student rearrange the flowers and then play the game again with her left hand.
The simple act of matching these “finger number clues” to keys on the piano is the reinforcement your students. Once they return to their sheet music they will have internalized this process and will know exactly how to figure out their hand placement.
The Definitely-Not-Frustrating Piano Books
Trevor and I have made it our life mission to create piano resources that are simple, straight-forward and effective. When we write our WunderKeys Method Books we spend months planning and testing the structure and presentation of lesson concepts so that kids are free from frustration as they fall in love with piano lessons.
Recently piano teachers had this to say about WunderKeys:
“I love seeing my students reach their goals. Their faces light up when they achieve something they didn’t think they could do. It brings my students, their families, and me a lot of fulfillment and joy. This is what finding your dream job looks like to me!”
I’m teaching little ones about music concepts that I never thought possible. The first time a student plays a duet with me, it’s so endearing to watch their face light up! I encourage other teachers to use WunderKeys.”
Visit WunderKeys.com to learn more about our preschool and primer method books.
Very clever! I can see changing out the theme for various seasons/activities. Kids love the hands-on activities; I’ve even had them call them “games” Yay!! As always Thanks! for sharing your genius:)
Hi Barbara! Yes, you can certainly modify this idea to suit snowmen, easter eggs, valentines… you name it! 🙂
So awesome! I have a 9 year old boy in Wunderkeys Primer 2 and his little brother is always asking him to teach him something on the piano, (his parents said he can start his own lessons in the fall!), this can also be a great tool for students to teach parents and siblings at home! I’ve found that some kids have a disconnect finding their hand position from just the note on the staff vs. the note name, (and because you’ve got my creative juices flowing!), I am going to create clouds with the notes on the staff and glue them to paperclips so students can match the note name, finger number AND what the note looks like on the staff (with the cloud above the flower) for a “Level 2” version after they’ve mastered the original!
Great idea Melinda 🙂
This is a great idea to help young children adjust to new finger positions. I’m going to try it out today! Thanks for sharing your amazing thoughts and insights
Great cloud idea, Melinda! If you use a blue felt backing glued to cardboard so it stands and white felt clouds, your clouds can “float” over the correct tulips! Kids love to stick felt onto felt boards! Like magic! You can glue another sheet of felt on the backside of the cardboard so the board doesn’t scratch your piano music stand. My variation includes detachable “position” lines for different 5-finger position letters for the elementary age group to join in the fun too! The older group make up their own 5-finger exercises on the board to copy or “translate” onto music staff paper and play in 3 speeds up and/or down the piano in sequences of even rhythm and/or “crazy” rhythms at home to develop more finger dexterity while detecting for all firm knuckles–they also think it’s a game–yay! When students really like one of their 5-finger creations, they are encouraged to develop that motive into a short composition to share at their next group session! The group then identifies and listens for that motive pattern “in action”! Thank you teachpianotoday.com for all your inspiring ideas to inspire us further!
Hi Anita – great extension ideas! Thanks for sharing and for commenting 🙂
Question…how much of the project would you do beforehand for your students? I’d be tempted to do all of the cutting, and maybe even the writing…and let my students do the gluing. Would they be more successful doing the whole project…altho it would take a good bit of time?? This is an awesome exercise in hand position! Thanks!
Hi Melissa – Yes, definitely have it prepped before hand. Think of it as a teaching tool rather than a piano lesson craft 🙂 The “hands on” part of it comes from their chance to move the flowers around to make different combinations to then play.
This is a great tool since “Where do my fingers go” is such a common problem! It seems to me though, that all 7 letters have to be included (ABCDEFG) otherwise it would not work. For instance, in the example you provided, the 4th finger falls on C — so fingers 1, 2, and 3 would fall on G, A, and B, and A and B are not there. Am I misunderstanding something? Thanks.
This is a great teaching tool, since “Where do my fingers go?” is such a common problem. It seems to me though, that all 7 letters would have to be included because, for instance, in the example you gave, if finger 4 falls on C, then fingers 1, 2, and 3 would fall on G, A, and B, and A and B are not on the grass. Am I misunderstanding something? Thanks.