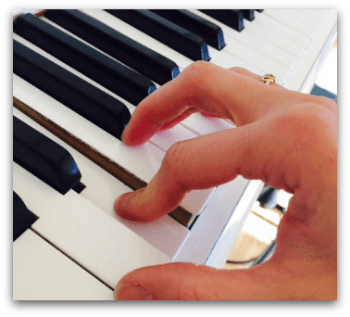
If you’ve ever had a piano student with collapsing finger joints then you know it can be difficult to remedy. If you haven’t had a piano student with collapsing finger joints and you’re wondering.. what is that? Then check out the picture below (where I collapse my 2nd finger joint closest to the finger tip on purpose).
Collapsing finger joints are something that are best remedied early on in your piano students’ lessons… and today we have the handiest little tool to share with you. You can make it yourself, your students will love to use it and it really works to bring strength to finger joints as well as an awareness of proper finger positioning on the keys.
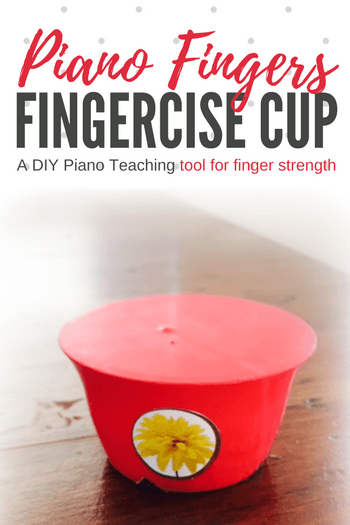
Introducing The Amazing Fingercise Cup
You can read and read and read about collapsing finger joints and you can explain and explain and explain how to fix them to your students, but this way is efficient and fun!
The little cup/drum you’ll see in the video below came home with my daughter from her preschool and I knew immediately what I could do with it. Building strength and (and this is key) awareness of correct finger position is important, and you can do this with a very simple exercise that uses this fun little tool. See the 2 minute explainer video below.
My Superman-loving 3-year-old daughter is the one in the video. You can tell that even her young fingers naturally find a correct shape in order to make the rewarding sound. The same sound can’t be made with a collapsed joint – and so there is also the aural-feedback benefits of this tool as well; your students will know when they are doing it correctly without you needing to be present.
How To Make Your Own Fingercise Cup
You’ll need a balloon, a small (empty) plastic applesauce cup, some beads or dried beans, a piece of duct tape and some stickers (to make it look fun).
1. Eat applesauce for breakfast, lunch and dinner 😉
2. Fill the empty applesauce cup with a tablespoon of beads or beans.
3. Cut the rolled rim off of the balloon (but not too far down) and stretch the balloon over the open side of the cup so that the top surface is completely flat like the skin of a drum.
4. Secure all edges of the balloon to the bottom of the cup with a square piece of duct tape.
5. Decorate with stickers.
Directions for Using Your New Fingercise Cup
Sending this tool home with your students to use before they play the piano as a “warm up” is a great idea. You can also use this cup in lesson time by inventing games to play that require different fingers to be used (simon says, copy cat etc.) and different rhythms to be created. As a bonus, this tool also doubles as an alternative to clapping rhythms (give it a shake and you’ll see what I mean!).
When back on the piano, a reminder of what it felt like to “pluck” the top of the cup (coupled with the strength your student has been building) will usually help to resolve that collapsing finger quickly!
Read Also:
Learning Legato With Play dough
3 Simple Ways To Fix Your Piano Student’s Stiff Pinky Finger
Do you know the size of the balloon?
Just a regular party balloon 🙂
I find that 9-inch balloons work better than larger balloons. A mixed bag of balloons has too many balloons that are only 5- or 7-inch – not big enough. The 9-inch balloons don’t reach to the bottom of the cup but fit so tightly they also don’t need tape on the bottom.
That is so great! Going to staff myself with that applesauce! Thank you so much!
Love this! I’m also going to send this to my friend who is a preschool teacher. It is a cool instrument to make for music time. Thanks for sharing such wonderful ideas.
Great idea…and so much fun!!! Thanks.
This is BRILLIANT! I have some older transfer students that I’ve got to try this with. I think I’ll try having them do a rhythm pattern with it (so they think it’s a fun rhythm activity and they don’t have to listen to me constantly asking them to strengthen their knuckles!) Also, I think adding the rhythm patterns will help them think it’s not a “kiddie game”.
Awesome!
A yogurt cup would work as well 🙂 I’m going to have to make one of these.
I love this idea!!! Thank you so much.
Balloons are on my list! Start the car!
My younger sister is having a hard time with finger strength – particularly with her middle fingers. I am definitely going to show her this!
I didn’t have any yogurt or applesauce containers around today (need to run to the grocery!) So…..I just made a quick one using a small square (1/2 cup) ziploc plastic container. I used a regular size balloon and it fit snugly over the container. I did not have any rice or beans in the house today so I used Steel Cut Oats. It works very well. I plan on using it later today with several students.
Awesome! Thanks for the alternate materials list Kimberly 🙂
Do you think this would also help with students who are double jointed? The middle knuckles actually curve downward. I have a boy with double jointed fingers and it’s like watching a spider make a web when he plays. I’ve been trying to figure out how to help him. Love this idea.
I know what you mean about the double jointed students. I think it is statistically impossible for me to have so many students like this!
After reading this tip I immediately went to work making one for my studio! I used macaroni in a small craft jar w/the lid removed. I am blesed to have the privilege of teaching my 8 year old Granddaughter who already played w/”tall knuckes” after only a few months of lessons. I will use my “mini-drium” to strengthen her fingertips & as a rhythm game! Thanks so much!!
LOVE THIS!!! I have tried so many things for my little students with collapsing joints. This is an excellent tool and I can’t wait to try it out! Thank you!
Well, once I saw this idea, I had to make one. I made one and used it with my students (most of my students are between 3 and 7). They LOVED it. I then went and bought a bunch of little craft containers and made about 12 of them (they take about 3 minutes to make) and gave them to each of my students who wanted one. Then when I was demonstrating to a parent how it worked, a man walked by my classroom (I teach at a lesson studio) and asked if I was the one who made “the balloon thing.” So I gave him one too, and showed him how to use it. It’s a hit! 🙂
love this! I made one, actually can’t stop playing it myself!
LOl! It does have an addictive texture to it doesn’t it May?! 🙂
Thanks Andrea, I am going to show this to my kindy teacher friends as well as making several of my own.
This is pure genius! I have been trying to fix this problem for years. What student isn’t going to want to make that annoying sound while correcting their technique with out even realizing it. Thank you for your continued creative amazing ideas!
Oh, brilliant! THANK YOU!
I’m a violin/viola teacher who also has students that have collapsing finger joints. Plus I’m always trying to maintain a curved left hand with the fingers being placed on the strings on the fingertips. I’m anxious to make a Fingercise cup and see if it would also be useful for my students. Thanks for the great idea!
Hi Kristen – so glad it will help with violin too!
I was thinking the same thing, Kristen! I teach both piano and violin and have adapted many of the games and technique ideas from this website to the violin. 🙂
I used the tops of shaving cream cans to make these for my students. They have really helped my students who used to have collapsing fingerjoints. Thank you for the simple and effective solution.
Thanks Andrea!! Do you think this will work with double jointed kiddos?! If so it’s going to be our summer project this week : )
I love this! I have made one for several students already. Planning to incorporate as part of every beginners first lesson! and its great to even introduce at the piano interview, for those students starting in Sept…they can play with it over the summer and already be strengthening those joints and experimenting with the different sounds it makes! Thank you!
Would this work for the students to make in a group piano lesson or do you recommend making these for them?
Hi Leigh – we’ve had a lot of teachers email to say they’ve made them at piano parties/group lessons and it went over really well. They’re very easy to make with no real “mess” to fret about either 🙂 I’d say go for it!
Great Idea! Wonderful thing!
Thank you for sharing!!:):)
Nice idea but I don’t think it’s needed for people who are double jointed. I’m very double jointed and my fingers collapse but I have no loss of strength or flexibility. I can play piano concertos without any issue whatsoever. Sometimes people can be too caught up in “you have to do it like this”. Vladimir Horowitz played with his hands flat, he did pretty well ;).
Hi Marcus – correct, it’s not intended for double-jointed pianists. It’s simply for young piano students who have collapsing finger joints that are clearly due to lack of strength and coordination. Often piano teachers want to correct this to prevent fatigue, injury and other problems that then result from this 🙂
I have students whos joints collapse into a l. Is this going to help them or is that considered jointed. For all of them its just one finger not all.
You´re a genious!!! Thanks a lot …
I bought a 10 pack of little plastic containers at the Dollar Tree and the Ballons (25for $1) and made these! Cost me $2! Thanks for sharing.