I have been using your tips for a few weeks and they are working! Thank you very much. BUT WAIT! I have one question. I was wondering if you knew of any fun ways to teach young students how to shift hand position on the piano. For example, from a first finger on C to a first finger on G. It would be great if you knew of a way to cement this aspect of piano for a student in an innovative, creative, fun way (rather than demanding lots of monotonous practice etc etc). PLEASE HELP!
One of the struggles of a beginning piano student is the “Where do my hands go to start?” question. And even once they’ve got the starting position down… throw a mid-piece leap to a new note into the mix and you can end up with a confused and frustrated student as they try to complete their at-home practice.
Whoooo Needs This Game?
Some piano method books hang out in predictable hand positions for a long time; your piano kids need only to know if they’re in “Middle C Position” or “C Position” and they’re set (at least for the time being). However, hand some of these students a piece of supplementary music that requires the placement of their first finger to be on a note other than C, and they’re completely befuddled.
Other method books set out to wean piano students of this dependency on C positions and have them moving their hands right from the start… but this can lead to some beginning piano students not feeling consistently confident in knowing where to start for each of their pieces; that finger to key connection isn’t quite strong enough as they just haven’t (yet) had enough repetition.
Learning Through Play Is Often the Way!
Here’s a fun game you can play with your students to get them used to moving all over the piano, and to be able to easily and accurately match a given finger number to a given key on the piano.
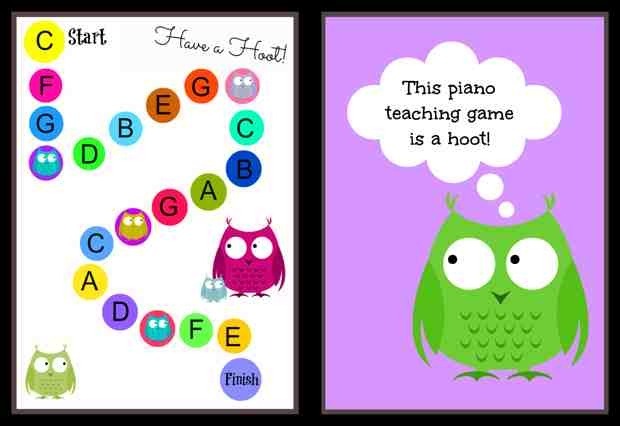
Have a Hoot! A Printable Piano Teaching Game
You’ll need a die, a marker of some kind (like a coin or a candy), the printable game board and the page of “Owl Cards” cut into 4.
How to play:
Your student rolls the die. The number that shows face-up is the finger number your student will use to play the key written on the game board under their marker. All students start on “C” at the starting circle. They roll the die, play C with the finger number that was rolled and, if they play it correctly, they move forward one space.
For example, if your student’s marker is on the letter “G”, and they roll a 3, they play a “G” with their 3rd finger. If they were correct, they move forward to the next circle and do the same. You can choose to alternate between right hand and left hand or you can play a full right hand or left hand game. The game continues until they reach the finish.
Rolling a 6 is a called a “Hoot!” They get to move forward two spaces without completing any tasks. It’s a “freebie”.
If your piano student lands on an owl they must complete one of the 4 “Owl Cards”. If they complete the card correctly by getting it ‘owlright’ 😉 they move forward 2 spaces. If they make a mistake they move back 2 spaces.
This is a fun way to drill the ability to match finger number to key for your young beginning students. This is a one-player game with the reward being simply the finish line. You can decide to add a treat or not once the finish line is reached. My kids usually just eat their marker as I use a Smartie 🙂 So go ahead… have a hoot!
Wow! Thankyou so much for this helpful game. I’ll definitely use it on one student of mine – it will be a huge help. Thanks for blogging.
Hi Sully – so glad to help! Hopefully it helps your student get past that hurdle. Happy teaching!
This sounds really cute and fun. I’m going to use it today! Thanks for sharing.
Have fun today!
This is a great idea! Does the game board fit on 8 1/2 x 11 paper?
Yes, it’s formatted for 8.5x 11 so you can print it at home, or if you’re wanting to have it laminated, send it to your local office supply store for printing.
Where have you been all my teaching career????your website is invaluable!!!! Thanks so much!
Awww… that’s so sweet! Glad you found us now Kim 🙂
Can’t wait to try this! Thank you so much!
BTW I just re-read the TPT book for the 3rd time. Every time I pick up something new. Although I’m having SUCH trouble getting lead sheets that my students can play – most of the rhythms are just too tough 🙁
Hi Leia – have you tried making your own lead sheets? This way you can get just the “hook” of the piece your student likes and can make it in any key with any rhythm. For my young students I just write out rhythmic approximations and they learn to adjust and use their ears to make the rhythm true to the recording. If you visit ultimate-guitar.com you can search any popular song, find out the chord arrangement and then just write the melody line as you choose. It’s the best way to have the most up-to-date material for your pre-teens and teens.
Thank you so much for this game idea!! I cannot wait to try it. I am going to laminate it because I am sure it will get lots of use.
I so appreciate the ideas that you send out!
Brenda in Kansas
Hi Brenda – laminating is a great idea… you can use it for many years. Marilyn also had a great idea in a comment below yours of using this game to teach major triads. The number you roll would then actually become the number of spaces to move. When you land you play a major triad (or even a given interval) on the key you end up on.
This is great for any of the beginning stages. Will really enjoy it. For students who know all their Major triads, they could play the given key with triad.
This is a great extension of the game Marilyn! You can also turn this into an interval game… they can play a major thirds, perfect 5ths etc. on each note too. Thanks for commenting!
I have a little transfer student that this will be perfect for! Thank you so much for sharing your imagination with us.
On a frugal note – I never laminate my games or worksheets. Instead I just pop them into plastic page protectors. It costs less than 10 cents per page, and you can even fill the page protectors with two games back-to-back to save space. The page protectors are great for using dry-erase markers as well.
Great tip! Thanks!
Just played the game with a student and had a lot of fun! Thanks for this.
Gary and Denise
Thanks guys, I also teach guitar and most of your games are easy to adapt. Thanks
THANK “YOOH!” I Love this position game idea. My kiddos will love it too. Thank you for you blog, and game ideas, and printable so you offer. I’m am avid reader for sure!! I also like the ways to vary this game that were posted in the comments.
-Amber in Oklahoma
This is EXACTLY what I need! How fun. Thank you for sharing.
Thank you so much for this creative way to match finger numbers and letter names. I look forward to trying it out w/my student this evng!
Awesome game idea!! Time to get my printer going this weekend. Thanks for these games!
You’re welcome Sara! You can find lots more of our games at http://www.pianogameclub.com too if your kiddos are enjoying game-based learning 🙂
Suggestion: Include the How to Play as a download so one can print it along with the game board and cards.
Hi Sue – this is a very old post, but in everything we do now the How To Play is included 🙂 You can find all of our free games and activities at http://www.wunderkeys.com by clicking on “Printables” 🙂